Gitflow Diagram
In this article, we will look into gitflow diagrams and its branches are, some examples, and how to create a gitflow diagram. We will also explore EdrawMax, the top-rated software to make a gitflow diagram for the team when working in a complex system.
1. What is Gitflow?
Gitflow is simply organizing the work into branches and its sub-branches. Working through a complex development workflow in a software development house is critical for teams with several developers. These teams frequently use a branching technique to plan and structure the development, manage new changes, and operate more productively to tackle this situation.
Gitflow diagrams can be used to map out and illustrate a possible workflow strategy for your team to gain buy-in and feedback before implementing it. Also, gitflow diagrams can be used to show how existing procedures are implemented across your development team.

Gitflow Diagram Branches
Main Branch
The main branch of the gitflow diagram is to hold a production-ready code that can be released. It is created at the start of any project. After being suitably vetted and tested, other branches will be merged into the main branch. The branch can be marked at various commits to represent different versions or releases of the code.
Develop Branch
The develop branch is generated at the start of a project and kept up to date during the development process. It comprises pre-production code and freshly developed features that are being tested. New features should be based on the developed branch, then merged back in when they're ready to test.
Supporting Branches
The gitflow diagram also consists of supporting branches, which are of three types:
Feature Branch
The feature branch in the git-flow diagram is used when a developer adds some new features to the code. When working on a new part, create a feature branch separate from the develop branch, then merge the changes back into the develop branch once the part is finished and examined.
Release Branch
When creating new product releases, the release branch should be used. Typically, work on release branches consists of minor bug fixes and finishing touches that are particular to releasing new code and code that should be addressed separately from the main development branch.
Hotfix Branch
The hotfix branch is used in Git flow to address urgent changes in your main branch. The main branch should serve as the foundation for the hotfix branch, and it should be merged back into both the main and developed branches. It's vital to merge the modifications from your hotfix branch back into the develop branch to guarantee the fix stays in the main branch the next time it's deployed.
2. Gitflow Diagram Examples
Let's understand the how gitflow model works by looking into its examples.
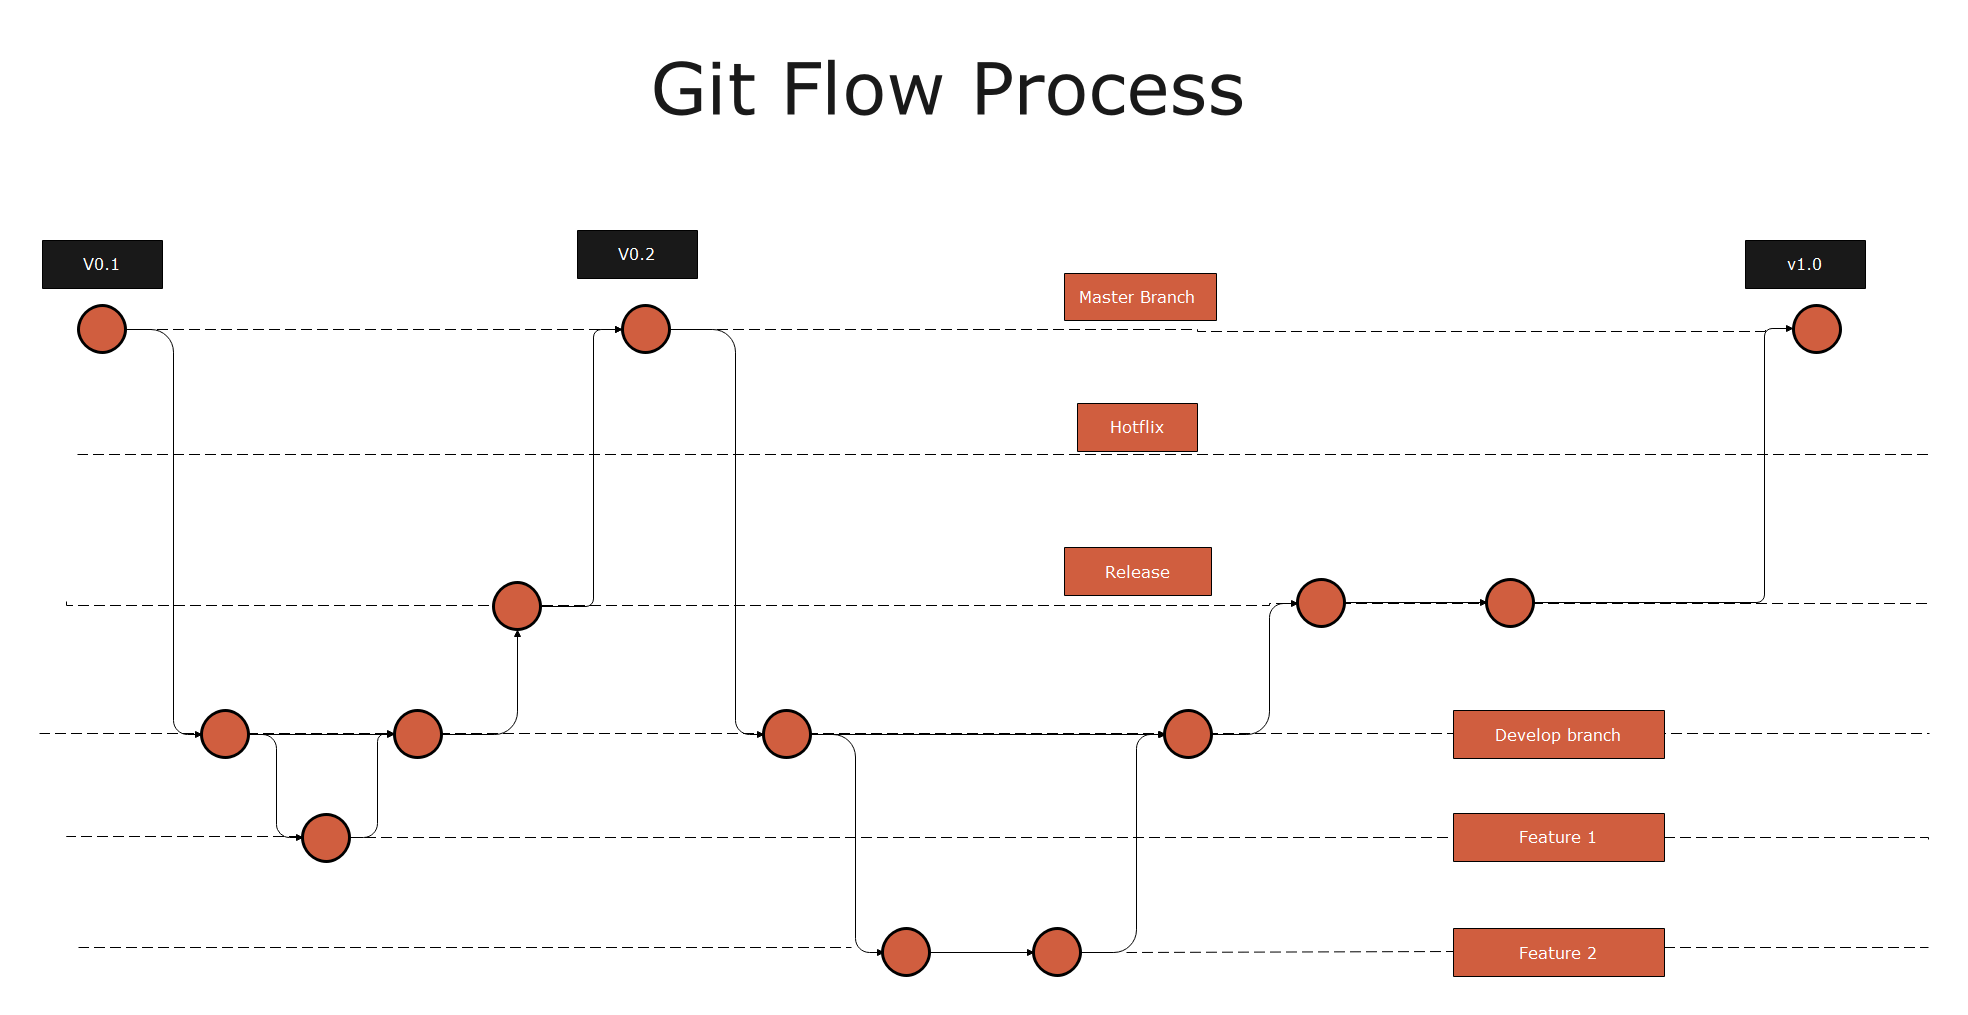
Example 1: Git Flow Process
Let's assume that you work in a software development house, and your supervisor has assigned you a task, and now all your team members are working on the development branch. Directly from the develop branch, construct a feature branch for your assignment. Once you have finished your modifications, integrate your feature into the development branch. The main branch will be merged with the development branch by the deployment manager. The production servers use your main branch.
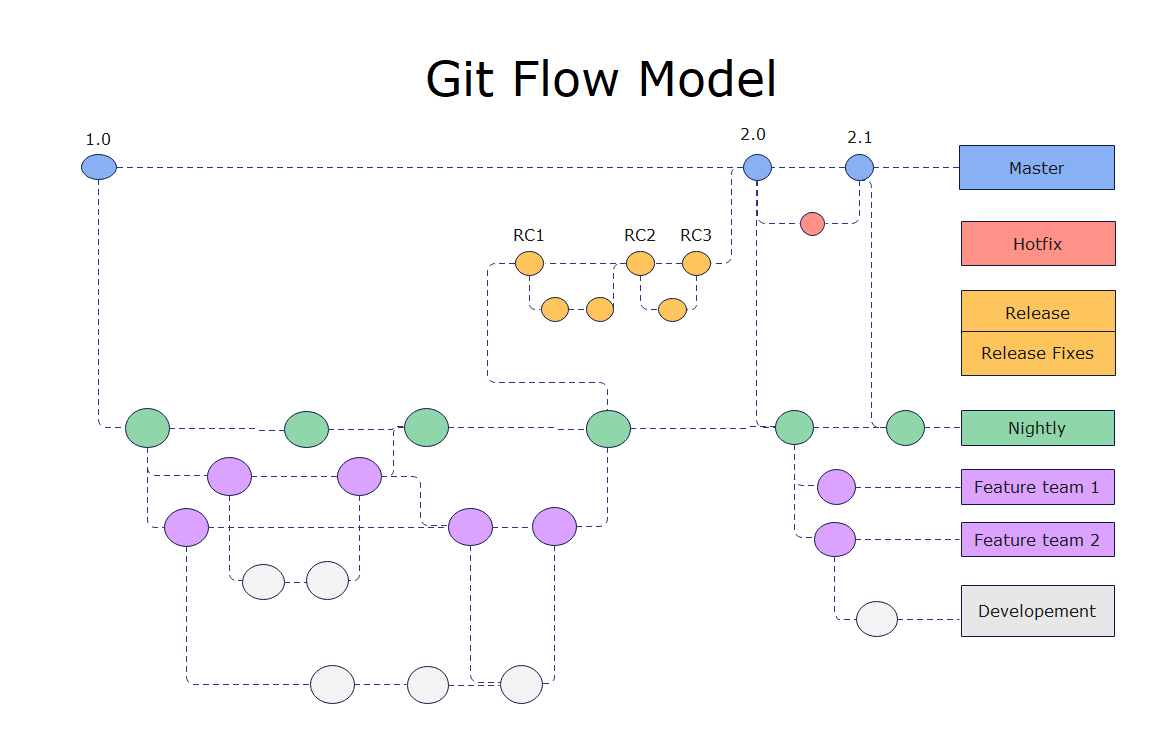
Example 2: Git Flow Model
Here in this example, hotfixes are applied directly to the Main branch. This structure shows what happens after a release candidate build is made, including a branch for automatic nightly builds, branches for features worked in parallel on the developers' private branches, and what happens after a release candidate build is created. As you can see, development branching methods can get pretty complicated. When they're visualized, they're a lot easier to follow.
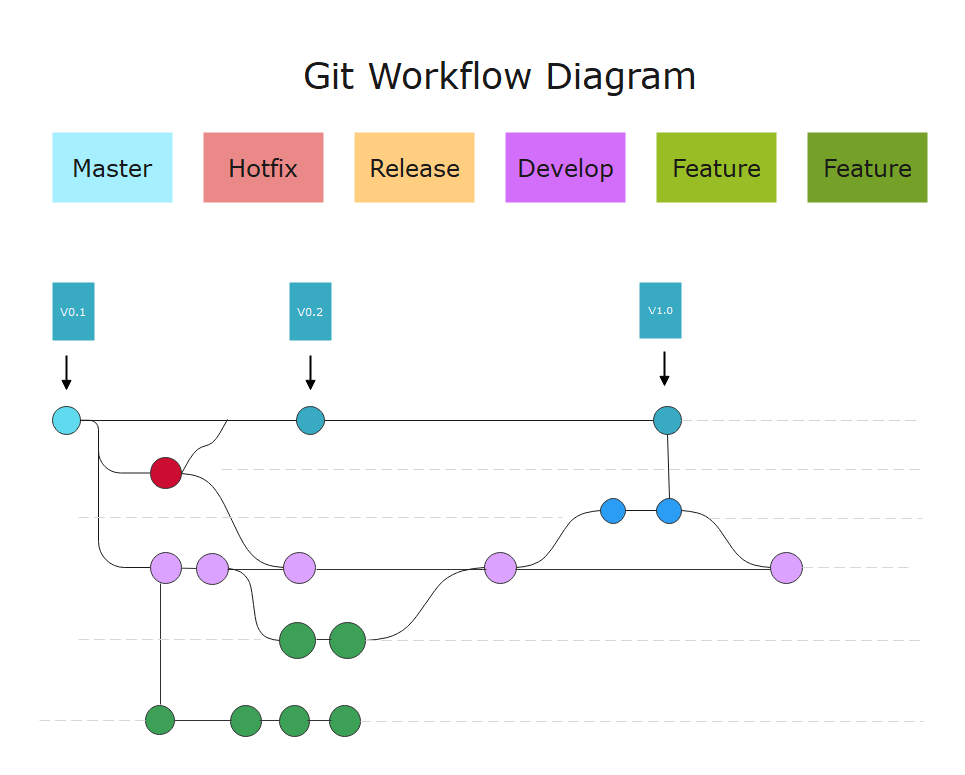
Example 3: Git Workflow Diagram
In the example, the Hotfix branches are employed to patch production releases swiftly. The only branch that should fork directly from the main is this one. The patch should be merged into both main and developed as soon as possible, and the main should be labeled with an updated number.
3. How to Create a Gitflow Diagram?
- Start your Gitflow diagram by introducing the Main branch first, draw a circle, connect a line with this circle, and extend the line to the right.
- Draw a development branch for work in progress by adding a second branch to your diagram drag it beneath the main branch.
- Connect your work to relate it to one another by connecting the branches. Connect the circles with arrows between the main and development branches.
- Add feature branches beneath your develop branch to illustrate the workflow of individual features being developed and then merged back into the development branch.
- Sits release branches between the develop and master branches and outlines the work done to move position from development to the product.
- Now design your diagram add colors and labels. It's good to give each feature branch its unique color to clarify the diagram.
4. Online Gitflow Diagram Maker
If you are a beginner, you may get stuck if you attempt to use any gitflow diagram makers available online without knowing its functionality. EdrawMax would be a perfect decision when considering a tool to make a gitflow diagram. The software supports every operating system like Windows, Mac, and Linux. Users can access the software quickly and make an online git flow diagram for them. The EdrawMax supports team collaboration, so you can easily create a perfect diagram with your group. Using EdrawMax, you can create more than 280 diagrams using thousands of pre-designed templates. You can then customize the templates as per your project diagram needs.
5. Key Takeaways
Parallel development is more manageable with gitflow diagram because it separates new development from the released project. The new work is done on feature branches, and when the developer is satisfied with the code, it is merged back in. You can work on any version of the project. Hence, developers need to make an efficient gitflow diagram for their projects that can easily be created using EdrawMax; the software is enriched with thousands of templates and exciting features. You can get a customizable git flow diagram for yourself.