A Guide to Understand Ankle Joint with Diagram
The ankle joint is a hinge joint and plays a crucial role in the movement, and hence understanding its structure and functions seems important for people. In this article, you can learn what does ankle joint look like, and how to make ankle joint drawing online.
1. What Does Ankle Joint Look Like
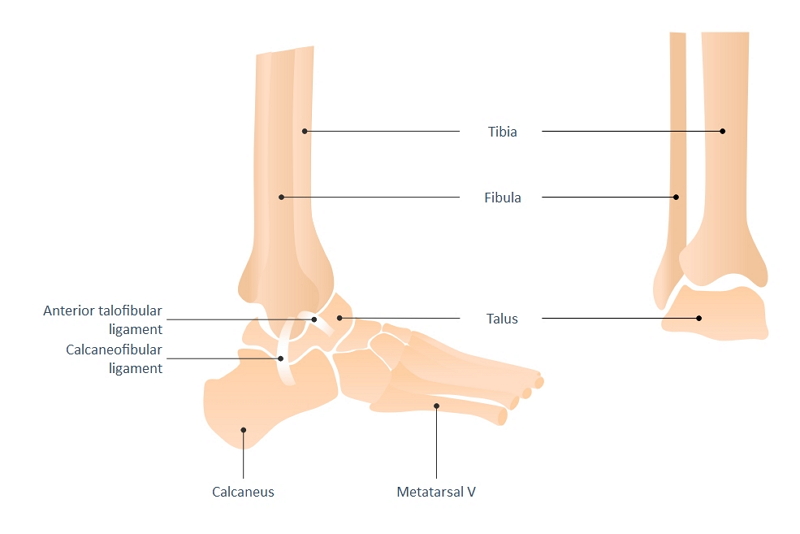
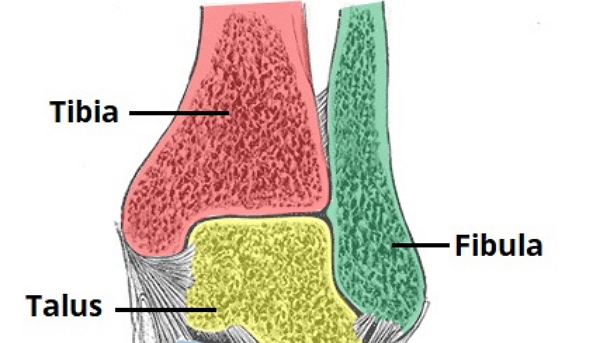
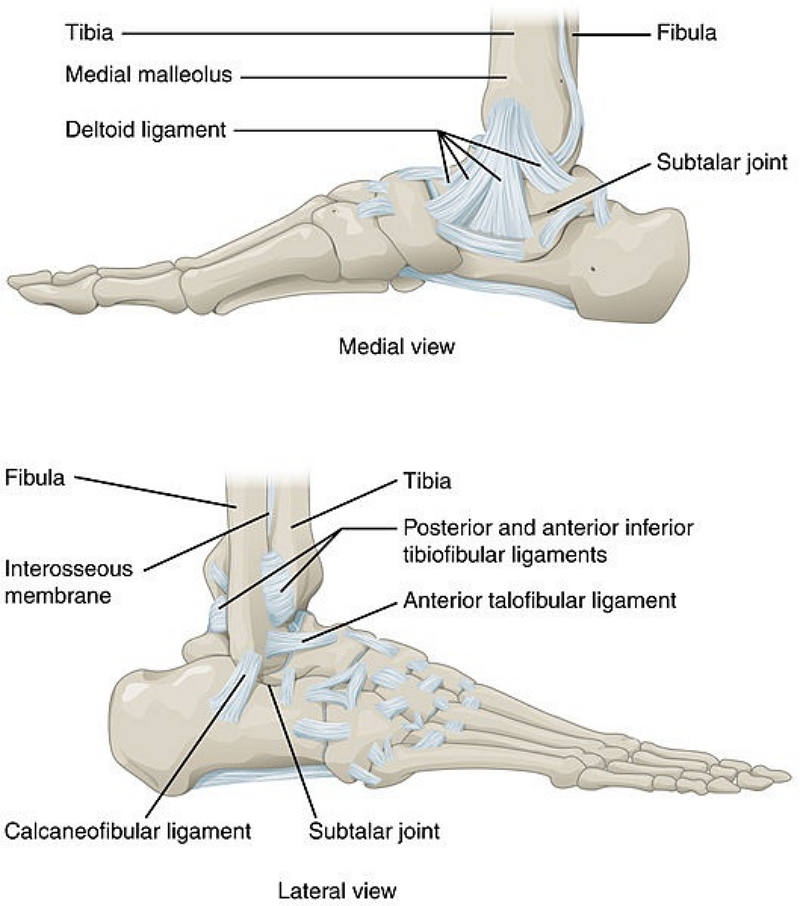
The ankle joint is a region where the foot meets the leg. By nature, it is a hinged synovial joint. The large joint consists of three bones, the shin bone, called the tibia. There is a thin bone present next to the tibia, which is called the fibula. The foot bone sits above the heel bone, which is called the talus. There are three protrusions seen in the ankle, namely medial malleolus, posterior malleolus, and lateral malleolus.
The medial malleolus is present at the base of the tibia with the posterior malleolus, which can be felt on the back part of the ankle. The lateral malleolus is the low end of the fibula. The ankle joint allows the up-and-down movement and the side-to-side movement. Numerous ligaments in the region connect the leg bones and with the bones of the foot.

2. The Structure of Ankle Joint
The ankle joint is a synovial joint, and the anatomy of the ankle consists of different parts, including the articulating surfaces, joint capsules, and ligaments. Here is a list of the function and components of these parts of the ankle.
2.1 Articulating Surfaces
There are three bones in the ankle joint, namely the tibia, fibula, and talus. The tibiofibular ligaments connect the tibia and fibula.
They create a socket covered in hyaline cartilage and is known as the mortise. The articulating part of the talus forms a wedge-like structure. The motion allowed are dorsiflexion and plantarflexion.
- Dorsiflexion: the anterior part of the talus is held by mortise and is very stable;
- Plantarflexion: the posterior part of the talus is held in mortise but less stable compared to dorsiflexion.
2.2 Joint Capsules
The joint capsules are present at the borders of the articular surfaces of the tibia and malleoli. From the anterior view, the joint capsules are broad, thin, and have a fibrous structure. On the other hand, from the posterior, they are thin there they get mixed with the transverse ligament.
The joint capsules stabilize the joint and protect it by limiting its function to extreme range. The joint capsules also distribute the mechanical load on the joint.
- Medial ligaments: the medial ligament consists of four ligaments attached to the medial malleolus. It works to prevent over-eversion of the foot;
- Lateral ligaments: the lateral ligaments originate from lateral malleolus. It has three ligaments that prevent over-inversion of the foot;
- Anterior talofibular: it is there between the lateral malleolus and lateral talus;
- Posterior talofibular: it is placed between the lateral malleolus and posterior talus;
- Calcaneofibular: It stays between the lateral malleolus and calcaneus.
3. How to Create Ankle Joint Drawing
It is simple to make the structure of the ankle joint. However, the bones structure may give some hard times to the students if they intend to do a freehand drawing on an ankle joint. People can check the bones structures and their positions thoroughly and follow the process step by step. Here are a few steps that can follow if they wish to draw ankle joint.
3.1 How to Create Ankle Joint Drawing from Sketch
Step 1: the first step is to draw the base, consisting of two arches. They hold the weight of the body. They are rock solid and do not get deformed easily. The students need to draw the tibia and fibula bones at first which hold this base.
Step 2: the primary three bones form the base of the base. They should start with the comparatively thick, long bone, namely the tibia, and a thin one next to it, known as fibia. The back of the ankle consists of another bone named the talus.
Step 3: once completed, the task is to create the five-bone arch structure, which makes the actual base and connects the base of the foot with fingers.
Step 4: then for the fingers, five three-bone structures lie in the apparent base of the foot and fingers. The students need to draw the bone size according to the size of actual fingers.
Step 5: when it completes, they can label the joints to finish their drawing.
3.2 How to Create Ankle Joint Drawing Online
As the whole ankle joint structure is slightly complicated because there are several bones, you may find it challenging to draw themselves. At this time, you must use the online tool EdrawMax, which can help create the ankle joint smoothly. They can create a perfect diagram of the ankle joint for their studies and science project if they follow these simple steps.
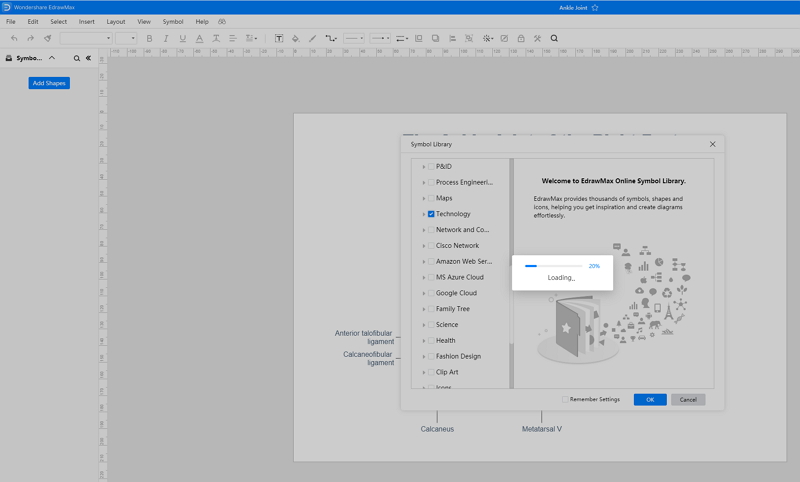
Step 1: though the ankle joint diagram may seem challenging, the user-friendly interface of EdrawMax can help the students to work on their drawings. To start with the task, they need to open the EdrawMax Online tool and then open New.

Step 2: you can find the Science and Education option present in the tool. They can explore several customizable diagrams in this part, which can help them with their learning.

Step 3: once select the ankle joint diagram, just use it immediately. But before editing your drawing, you need to choose the symbols and shapes that need to use from symbol libraries.
Step 4: keep customizing as your preference, such as add some notes, add more details, and even make the diagram from start.

Step 5: Save and export your ankle joint drawing to any type of formats, including Microsoft Office, PS, Graphic, PDF, HTML and so on. Also, you can share your diagrams with friends and teachers on social media, or just print it out and take it for presentation.
4. What is the Ankle Joint Pain
If a person feels any discomfort in their ankle, that is called ankle pain. The area may seem challenging to move, sore or swelled, and the individual may experience discomfort.
1) What caused ankle pain
Ankle pain can be chronic due to arthritis or, it may be a result of some injuries. Aged people over 65 years may experience some ankle pain. If someone is engaged in sports or other strenuous activities relating to the ankle, can also feel ankle pain. Obese people may get ankle pain from carrying the extra weight. Infection, sprains, fractures, and diseases like bursitis, tendonitis, arthritis, flatfoot, gout, can also be the reason for ankle pain.
2) How to prevent ankle pain
- Maintain an active lifestyle and get rid of extra weight;
- Warm-up properly before exercises and use athletic shoes for sports activities;
- Avoid running barefoot on uneven surfaces;
- Stay away from heels shoes and prevent recurring ankle injuries.

5. Conclusion
Human body movements are severely dependent on the joints and their functions. The ankle joint is present in the legs and highly functional when it comes to walking. It is crucial to check the structure and features of ankle joints to understand their functioning as joints. The students must use diagrams to study its composition. As creating a freehand drawing of an ankle joint may seem challenging, the students must use EdrawMax online tool for this task.
In conclusion, EdrawMax Online is a quick-start diagramming tool, which is easier to make artery and vein diagram and any 280 types of diagrams. Also, it contains substantial built-in templates that you can use for free, or share your science diagrams with others in our template community.


