How to Create a Tape Diagram
1. Introduction
Knowing how to draw and solve mathematic problems using a tape diagram is essential for every student. It helps students understand math concepts and depict relationships in a math problem. Students can use it to communicate their thoughts on any problem and sort out its contents and connections to find an easy and simple solution. These diagrams are mainly used to help students solve any word problem. Our guide will help you understand how to do a tape diagram.

2. How to Create a Tape Diagram
You can easily create a tape diagram by following a few basic steps. It visually illustrates complex problems in a taped segment divided into smaller rectangular sections. Students from all grades can use these diagrams to solve mathematic problems and equations. Knowing about tape diagrams is very helpful to students who move to new grades and deal with advanced math. Tape diagrams break down any complex word problem into simple parts. Follow these five steps to draw a tape diagram.
Step 1: Understand the topic
The first step to creating a tape diagram is determining why you need it or what problem you are trying to solve. Understanding the topic is about carefully reading the given problem statement or math equation. After that, you will understand the given problem and the steps to solve that problem. In math, you see various types of equations and problems, and that is why it is essential to analyze them before drawing a diagram to solve them.
Step 2: Divide the problem into sections
After reading the problem statement, the next step is to divide the problem into sections to find its easiest solution. When you divide the problem, you will understand which parts are essential for the diagram and which parts are already solved in the given data, so you don't have to solve it again.
Step 3: Draw the diagram
Start drawing the tape diagram after analyzing the problem and contemplating its possible solution. First, you have to draw a long rectangle tape like segment and then divide it into various sections in small boxes. The number of cells you draw depends on the given problem statement. You will need to create at least two sections, but there is no upper limit.
Step 4: Organize data
After your diagram is complete, it is time to add and organize data into the diagram. You can do this step from your understanding of the problem statement. Read the statement once again and add numbers, variables and other mathematical symbols to represent the problem visually. Once you organize data, the only remaining step will be finding the solution.
Step 5: Label the diagram
Solving the given problem will help you check whether your tape diagram is correct or not. To solve the problem, you have to label the diagram and solve the whole mathematical equation using the data provided by your tape diagram. You can use it for simple arithmetic operations or solve various complex problems.
3. How to Do a Tape Diagram with EdrawMax Online
The best choice is to use diagramming software such as EdrawMax Online to make your tape diagram. You can create tape diagrams from scratch, but it will take a lot of your time, and if you are drawing it for the first time, doing it on EdrawMax, where you can get any symbol or icon your want, will be a smart choice. With EdrawMax, you will get a template library and customization tools to edit your diagram, and you can easily export your diagram in any format you want.
Open EdrawMax Online and sign up to create an account. If you already have an account, then log in. All you have to do is enter your username and password.
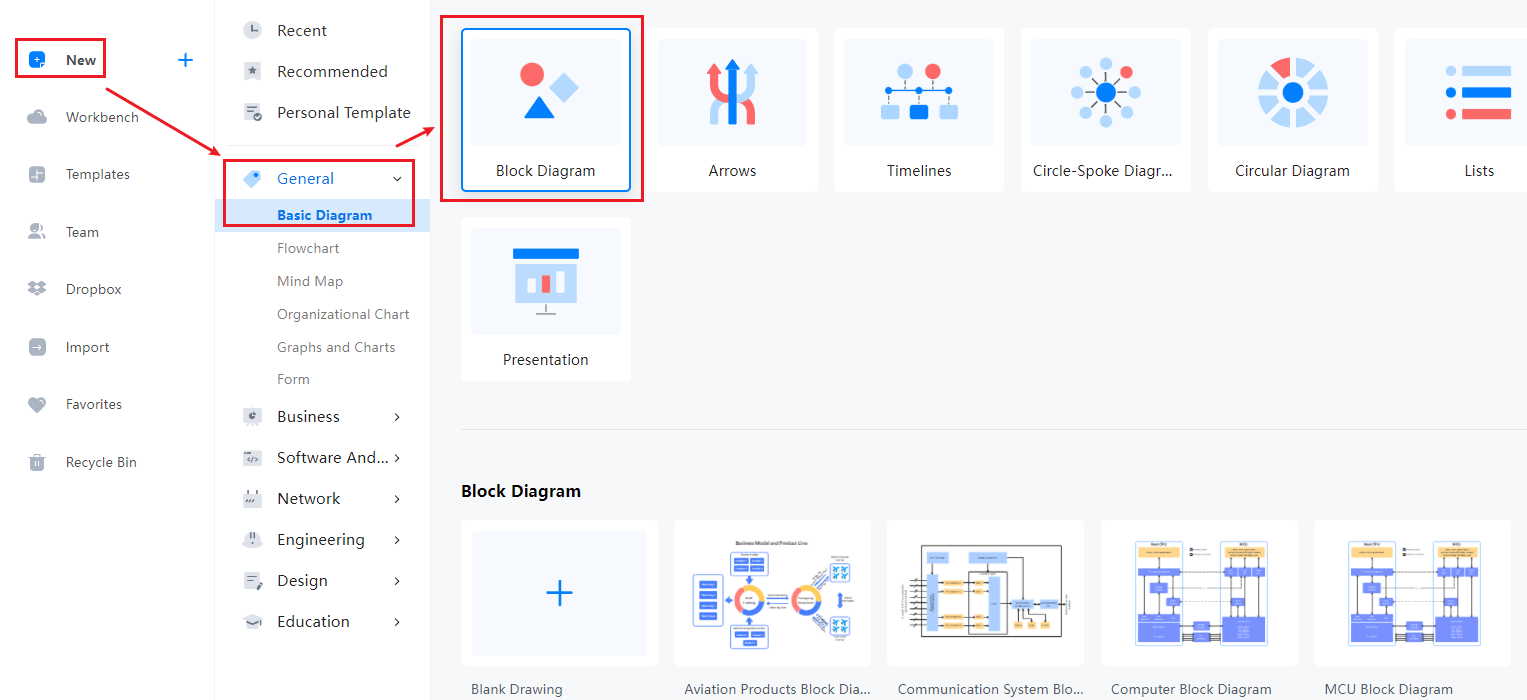
After you sign in, navigate to General>Basic Diagram>Block Diagram. After that, you can click on it to get a blank canvas. You can start creating the diagram, and you can look for symbols in the symbol library to the left side of the canvas.
You can also look for templates in the EdrawMax Online template library. All you have to do is either go to templates or click the search bar. Type the diagram's name and get a comprehensive list of templates professionally made for you. You can easily make changes to these templates according to your requirements. Find more templates in Templates Community.

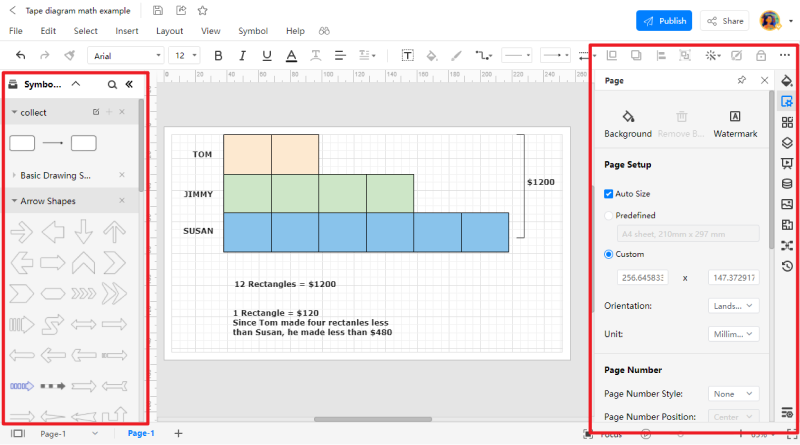
You can customize your tape diagram by using symbols from the library. You have to click and drag the symbols you need and add them to your diagram. You can also add text and change font styles and text colors. You can add shapes, and there is a toolbar at the top of the canvas with various customization options.
You can save your drawing in all popular formats using EdrawMax Online. You have to go to files and click the save or export options. Please select the format you require, such as docs for a text file or jpeg to export it as an image.

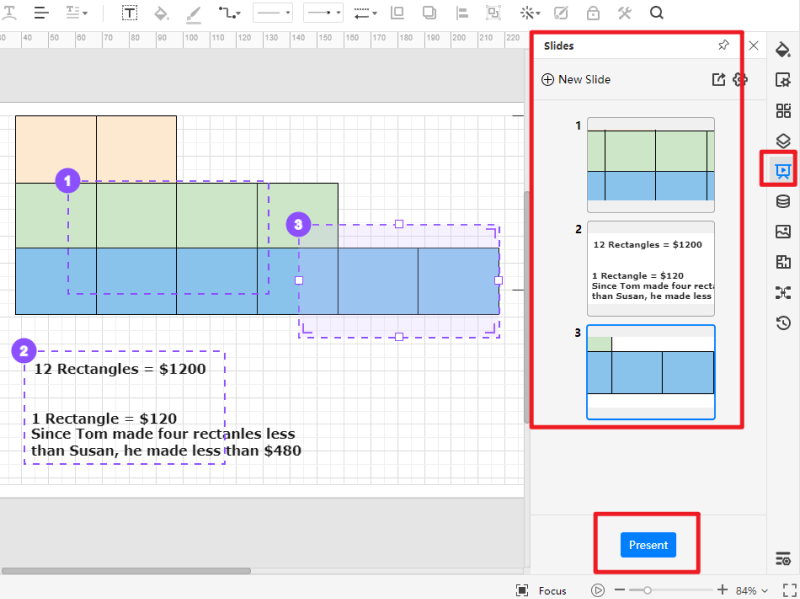
You can create presentations on EdrawMax Online for your project. You can add slides to explain your diagram, and you can style every slide differently to make it more creative.
4. Expert Tips for Creating a Tape Diagram
Tip 1: Draw after understanding the problem
When you draw a tape diagram, always remember you are doing it to quickly solve the given problem, not to create extra work for yourself. Understanding the problem statement comes first, and you can't draw a diagram first and then move towards the problem statement. Even if you are solving similar math equations, reading and analyzing the problem is always helpful before making a diagram for solving it.
Tip 2: Don’t make extra sections
The number of sections in the tape diagram affects the problem solution. You need the ideal number of cells to organize the data given in the problem statement before solving it. Having extra or fewer sections will get you to the wrong solution. Making tape diagrams is simple, and there is little chance of mistaking the number of cells.
Tip 3: Always review
Make sure you review your diagram before you turn in your assignment. When you review the diagram, you will have to check each step of your solution from start to finish in the given hierarchy. You can also ask your friends or instructors to review your diagram.
5. Key Takeaways
A tape diagram is a graphical representation of math concepts and relationships for students to understand and solve any mathematical problem quickly. It is also a block diagram in the shape of a taped segment. You can use lines to divide the diagram into various sections to solve the problem or equation. To draw a tape diagram, understand the problem statement and organize the given data into sections based on that statement. Find more tape diagrams templates.
EdrawMax Online is the best diagramming software that helps you create three hundred types of diagrams and charts. You can easily create tape diagrams with EdrawMax, and you can save your time and effort by using its template and symbol libraries. It also gives you various editing tools and options to help customize your project and make it presentable.