How to Draw a Reflected Ceiling Plan
1. Introduction
The idea of using reflected ceiling plans is to depict and portray the constituents and elements that will be found in the ceiling of a room. RCPs are important for the overall blueprint as they allow builders, engineers, technicians, and plumbers to understand where certain fixtures have to go.
In this guide, you will learn how to draw reflected ceiling plans quickly. You will also learn some concepts that will help you realize what makes a good RCP plan.
2. Understand How to Create a Reflected Ceiling Plan
There are a couple of things that you need to sort out before making a reflected ceiling plan.
1. The Basic Layout of the Room(s)
The first that needs to be created/ticked off is the basic layout of the room. The furniture, fixture, and other systems come later on. The first thing that needs to be done is creating the bare structure which involves the walls and doors etc. in an RCP, it can be observed that doors are depicted with their swinging pattern to show which way they will open.
2. The Furniture Positioning
The furniture positioning is also an important part of the RCP. The anticipated position of the furniture and the objects in the room decide where certain fixtures have to go.
3. Wiring, Appliances, and Fixtures
This is the part that is shared by the architect and engineer. The architect has to design the fixtures and mark their locations while the engineer has to take care of the wiring and circuits etc.
Therefore, before actually starting on creating the RCP, it is a good idea to compile an ordered list of such fixtures so you can easily place them on the diagram when the time comes.
4. Create your Reflected Ceiling Plan
Once you are done with assembling all the required information and requisites for the RCP, the next thing is to get started with creating the actual diagram. That is where EdrawMax comes in, and that part is what we will explain in the following steps.
3. How to Create a Reflected Ceiling Plan?
The first thing you need to do to get started with EdrawMax is to sign up. If you are already a member, you can simply log in using your details and get started.

When signing up, some details such as your name, email address, and password are required. Once you are all signed up, open up EdrawMax Online. If you are already a member, then simply log in and you are good to go.
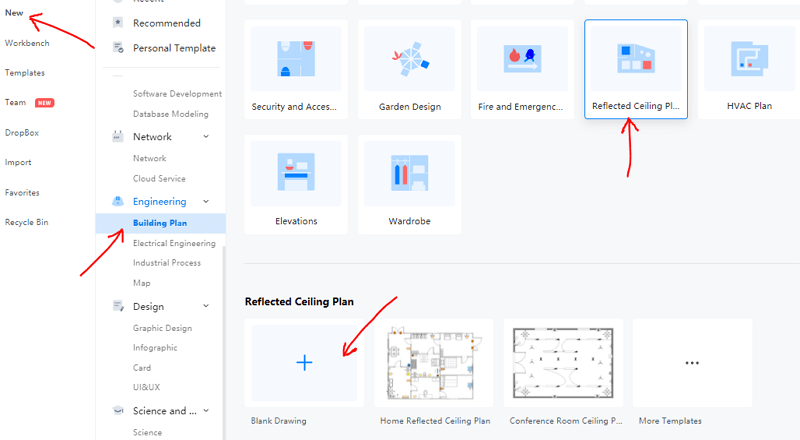
Once you are logged in, click on the ‘New’ option situated at the top of the left-most menu on the screen. This will expand another menu which will have categories and sub-categories. Scroll down and select the ‘Engineering’ category. Select the ‘Building Plan’ sub-category. A menu will open up with different layouts and diagram options. In the second row, you will see ‘Reflected Ceiling Plan’. Click it and then select the ‘+’ to open a blank page.
Once you are at the blank drawing, you can pick your desired shapes and symbols from the menu on the left side of the screen. If you want to put a symbol on the canvas, you can simply click and hold it to drag it to your desired location.

For Reflected Ceiling Plans, there are a variety of symbols that you can select from the menu to depict electrical fixtures and lighting appliances, etc.
Once you are done drawing the basic layout for the diagram, you can style your diagram using arrowheads, text, line fills etc.
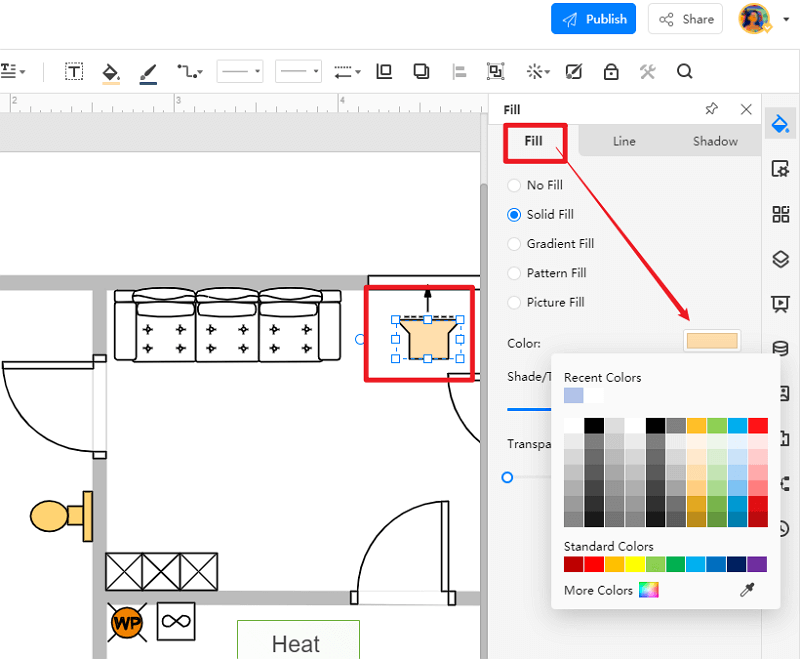
In order to use these styling features, all you have to do is head up to the top bar and choose your desired feature. In RCP plans, you can choose to give certain pieces of furniture a separate color while giving a specific type of fixture another color.
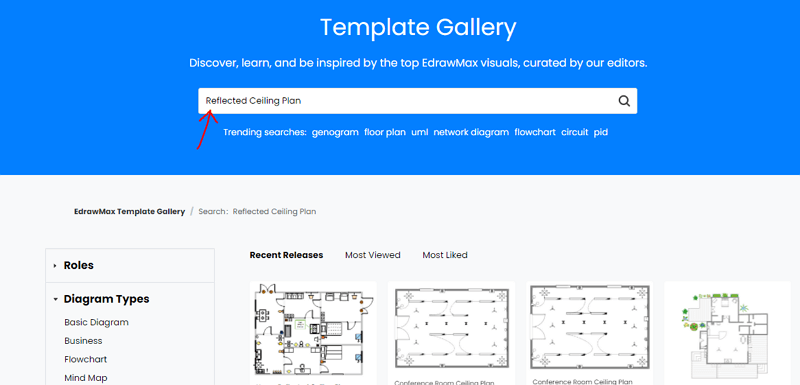
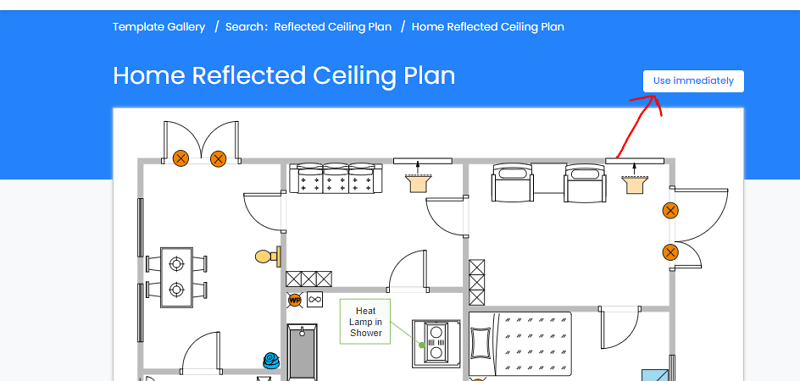
If you are not inclined to make the entire diagram from scratch, you can choose a template from the Template Gallery to save time on the basic layout. Using a template can be useful since it will allow you to save time in making the basic walls, doors etc.
After you are selected your template, you can simply click the ‘Use immediately’ button to start editing it online. There is no hassle about downloading anything.
Once you are done with your work, you can save it and export it to the format of your choice including PDF, Word, Excel, and PowerPoint.

By clicking on the ‘Use Immediately’ button, you can instantly start editing the template as your own.
4. Expert Tips for Creating Reflected Ceiling Plans
Making a Reflected Ceiling Plan is not that difficult. Especially with platforms such as EdrawMax, drawing one is an absolute breeze due to the easy drag-and-drop method. However, while simply making a diagram is easy, making a good one is not. Here are some tips that you can follow to make a nice-looking, succinct RCP plans.
- When making the RCP plan, mention the construction/material of the ceiling itself. You should mention or depict what sort of construction your ceiling is going to have.
- Always create a legend and consistently adhere to it so that readers can peruse your drawing easily.
- Add furniture, doors, and windows properly. Adding furniture is, as mentioned previously, useful for deciding the placement of lights, fixtures etc.
- Add dimensions and scale to your RCP plan.
- Use symbols and letters symmetrically in order to keep your drawing neat and easily readable.
- Add colors only to symbolize fixtures and appliances. Don’t paint your beds green, sofas yellow and chairs red.
Some suggestions that you can consider when making an RCP plan are as follows:
- Use proper software to make your drawing. The software that you use should have good features and functions so that you can easily create the plan.
- Try using a template. Using a template helps to save time.
By sticking to these tips, you will learn how to draw reflected ceiling plans in an efficient and expert way.
Wondershare EdrawMax
EdrawMax is the easiest diagramming tool that serves all your purposes. Try Free Online now!


5. FAQs About Creating Reflected Ceiling Plan
What is Reflected Ceiling Plan symbols and legends?
Reflected ceiling plan symbols are used to show where fixtures, lightings, and electrical appliances have to be placed. A legend is a document or a list that shows what each symbol represents. In order to show lights, you can use a certain colored shape while you can use dotted lines to show electric circuits. But in order to let the reader know and understand what those symbols mean, a legend is used. This legend, or key, has to be given to the reader as a reference in order for the diagram to make sense.
How to draw Reflected Ceiling Plan in AutoCAD?
AutoCAD is a cloud-based service from Autodesk. In order to create a Reflected Ceiling Plan in AutoCAD, all you have to do is sign in and click on the ‘View’ tab. Then select the ‘Create Panel’ option. From the ‘Plan Views’ drop-down menu, choose ‘Reflected Ceiling Plan’.
This is how you can get to the blank window. If you want to create a reflected ceiling plan using AutoCAD, it is advisable to first check out a guide where all the functions and features are explained in detail.
How to draw Reflected Ceiling Plan in Revit?
Revit is also a product by Autodesk. Just like AutoCAD, you will need to sign up and log in to get started. Revit has a paid version and a free version. It can be downloaded, and it requires certain specifications that your system must meet. After downloading Revit, you can get started on making your reflected ceiling plan. You should learn about the different features and functions by referring to a guide or to some FAQs on the net.
6. Key Takeaways
- Reflected Ceiling Plans are essential parts of the overall blueprint since they portray the design and layout of the ceiling. RCPs are also important since they show where fixtures, appliances, lights, and wires have to go.
- Reflected Ceiling Plans can be easily created with online software. EdrawMax Online is one such cloud-based service that you can use to create RCP plans from scratch, or from a preset template.
In this guide, we looked at some basic concepts about RCPs. We learned how to draw reflective ceiling plans using EdrawMax Online as well as some tips that you can stick to in order to make your drawing look professional.
Create and share 280+ diagrams with EdrawMax Online