The Ultimate Guide To Planogram
Create a Planogram Online Free Free Download Free Download Free Download Free DownloadWhat Is Planogram?
A planogram is a diagram that represents how and where particular retail products are to be positioned on retail shelves or showcases to boost customer purchases. They are comprehensive and detailed layout drawings of a store, with particular emphasis on product placement. It can be defined as a schematic drawing or a plan to show products in a shop to increase sales.
As well as providing a schematic illustration of the aisles, tables, and point-in-sale in your shop, for example, a planogram will show you precisely where different items are placed. The detail in a planogram; it will show the exact shelf that an object is stored in.
A planogram is typically a common portion of more detailed documents of visual merchandising. These are especially useful for big-box supermarkets or convenience shops that sell several items (and types of goods) from a variety of vendors and have lots of space to fill.
The diagram will document how high or low the product should show on a shelf, as well as what products should surround it. Planogram modules are also used in software applications for large area design and retail site management.
Types of Planogram
- Placement of the product based on their market share
- Margin based product placement
- Product placement based on their commercial status
- Block placement planogram strategy
- Horizontal planogramming method for positioning of items
- The vertical planogramming technique for positioning of the product
This planogram technique is the most straightforward approach. Through this type, various goods are allotted space on a store's shelves depending on their income-generating potential.
A dealer sells items in his shop that are made by different suppliers. The merchant offers to market certain items based on the manufacturers' margin provided to him. Based on these margins the product will be placed.
In this type of planogram strategy, higher-brand products are assigned the prime location on store shelves compared to lower-brand value products.
Block positioning is the shortest and fastest way to put items in the market. In this technique of planogramming all items of one family are put together regardless of their market name or percentage margin.
Through the horizontal planogramming method of product positioning, items are positioned at the same level of the eye horizontally on the side by side racks. That way, consumers can quickly learn from different companies on related items.
In this type of planogram technique, similar items of multiple brands are put at separate locations in the rack.
Benefits of a Planogram
The use of planograms to plan the store layout has many benefits and they usually come into two main advantages: maximizing sales and space.
- Maximising sales:
- Maximising space:
Using a planogram in your visual merchandising planning process allows you to collect data on how products and displays work.
Mapping it to the exact spot on the shelf is like holding a magnifying glass to your details and that's how you can gather the information that is very actionable to maximize product placement for in-store sales.
Planograms also allow the strategic placement of products from a cross-merchandising perspective. It's easier to map those routes with a planogram. This helps create space for products and understand which product goes where.
How To Draw a Planogram?
- Measure each of your fixtures
- Depth and width of each section of the shelves or racks.
- Amount of cabinets, or shelves.
- Spacing between shelves or tables, or appropriate space to hang things.
- Decide precisely where to put any object
- Create the planogram
Then, check each product's wrapping or the lengths of the soft products as they are folded or hanging. These measurements together will tell you how much product you can put into your display.
Don’t place products randomly on the basis of your convenience. Take time when preparing and designing your store, to consider various factors. Ensure that you consider: Brand, Visual, Season, Supply of inventories, Popularity, and Cost.
Create a planogram diagram, which demonstrates how screens will be positioned relative to each other. This makes it more reliable.
While a planogram ensures consistent placement of the product, it should be flexible too. Often re-evaluate it, track what sells and what doesn't, so you can make adjustments.
Examples of Planogram
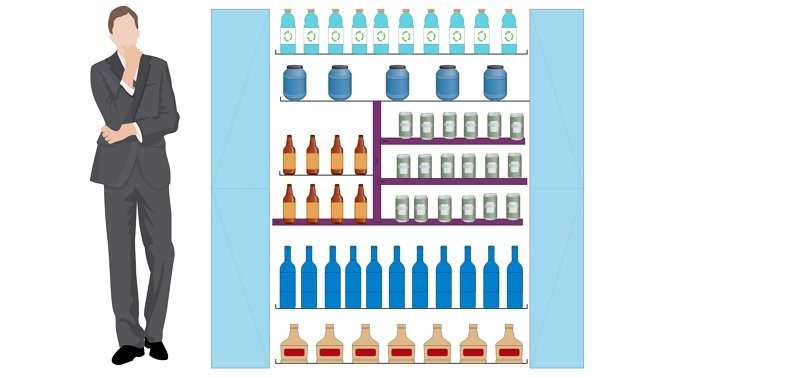
In the above diagram, the aisle includes bottles and beverages. And liquids of any type. They are placed in horizontal product placement. With each shelf consisting of different brands so as to offer consumers choice.
Tips When Creating the Planogram
- Firstly, ensure that you have the correct product selection for each type of product.
- Communication between retailer and supplier often requires the sharing of data and alignment around the roles of the categories.
- Be sure the standards of merchandising are appropriate to ensure the goods are put in the right places.
- Planograms will also examine your shelf space before, after and after the operation to provide an insight into what the consumers prefer.
- Finally, stick to the process right up to the end and make sure you execute the planograms in supermarkets.


