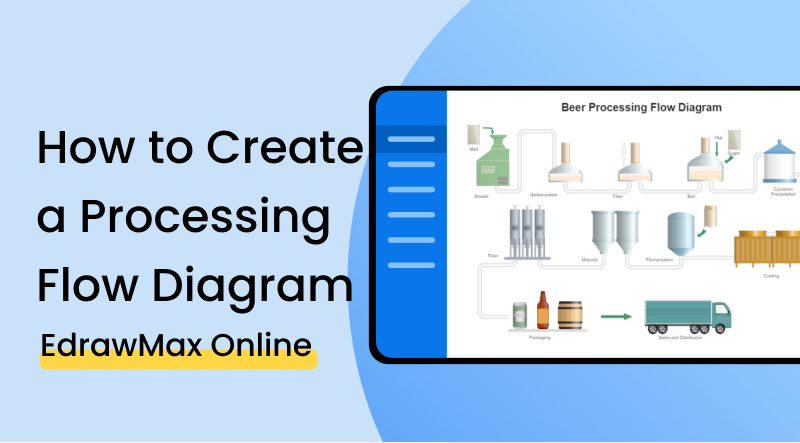
How To Create a Process Flow Diagram
1. Introduction
How to create a process flow diagram? A PFD is a graphical representation of a process, the relationship of its major components, and their tasks depicted in sequential order. It is commonly used in process engineering to explain constituent tasks and make improvements in the process design. Before you look at the steps to create a PFD, you need to understand what it is and its purpose. You can add as many details as you want to document the overall process.
2. How to Draw a PFD?
One of the most important things to keep in mind before create a process flow diagram is that it must contain all the information and steps required for the process to occur. A PFD can either be simple or complex, depending on the process it represents. It also involves many symbols to classify its various components. Follow these steps to create a PFD.
Step 1. Define the Process
The first thing to do before you create a process flow diagram is to define the scope of the process. You can only do that if you know what the process is and what is it supposed to do? The PFD explains the process in sequence by defining various tasks involved in it. It helps you get a better understanding of process flow and its required components.
Step 2. Determine the main components
After defining the process, you have to determine the inputs and outputs and their various components. The input of any process refers to all the information and elements required for the process to work. Without any specific input, you can't create a PFD. Output refers to various things, and it can either be a result of information. It can be the final product or service. Decisions or input for other processes can also be output from your PFD.
Step 3. Define constituent activities
As you know, that process flow diagram depicts a process in sequential order. That is why you have to define activities related to each component in a progressive order. Make sure to order activities for all main components.
Step 4. Specify symbols for each activity
The best part of visual representation, such as a process flow diagram, makes it easier to understand any complex process. To do it right, you have to specify and use correct and distinct symbols for each activity and component of the diagram. Using one wrong character can change the process flow and make it ineffective.
Step 5. Connect activities
After you specify symbols for activities, start using arrows, pointers, and lines to connect actions and components in the diagram. Most people use arrows to connect or define relationships because lines can complicate the process flow if your PFD contains many activities.
Step 6. Indicate the process flow
Indicating the process flow is an essential step when you create a create a process flow diagram. In this step, you indicate the start and end of the process. You show the process flow based on constituent activities. You can either move the flow from top to bottom or left to right.
If the video doesn't play, please visit it at YouTube.
3. How to Create PFD with EdrawMax Online
If you want to create a process flow diagram, it is better to use the right software. EdrawMax Online gives you a comprehensive collection of symbols and icons that you can use in the diagram. It also gives you many other options and tools to make things easier for you as much as possible. Follow these steps to create a PFD with EdrawMax Online.
The first thing you will have to do is make an account on EdrawMax Online At the top right, you are going to see a login button. Click on that, and you will be directed to the sign-in screen. Select the 'Create Account' option under the fields.
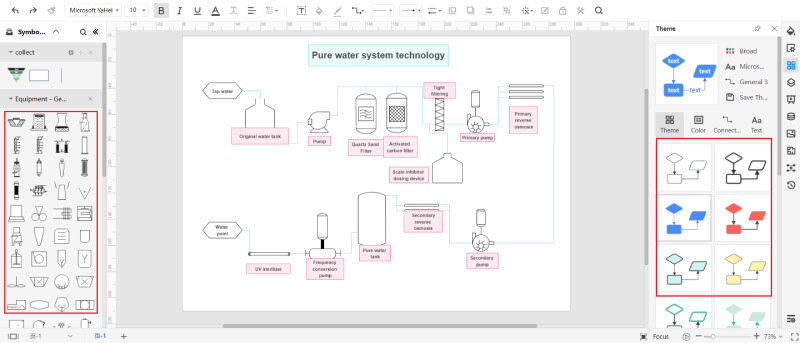
After you sign in, go to Engineering>Industrial Process>Process flow diagram. After you click the process flow diagram, you will get a black canvas. You can start creating the PFD, and you can look for symbols in the symbol library to the left side of the canvas.
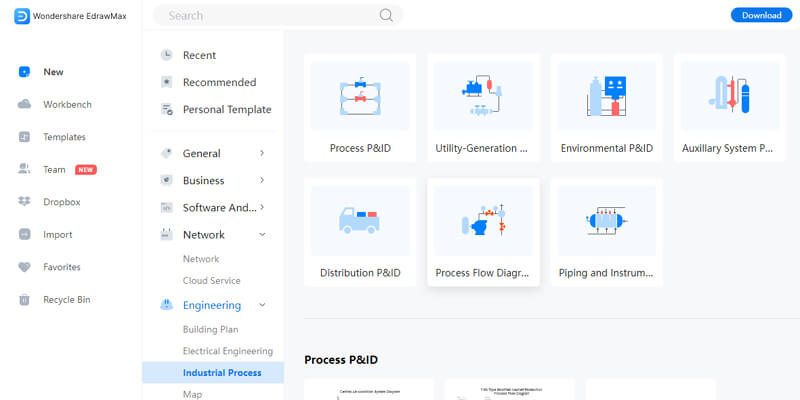
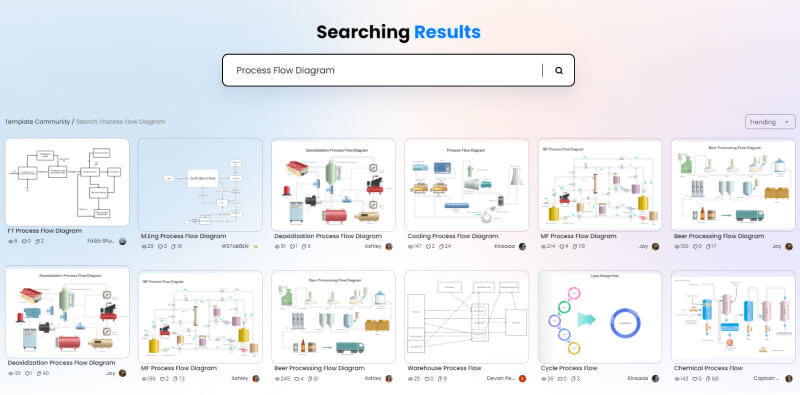
You can also look for templates in the EdrawMax Online template library. All you have to do is either go to templates or click the search bar. Type the name of the diagram and get a comprehensive list of templates professionally made for you. You can easily make changes to these templates according to your requirements. Find more templates in Templates Community.
You can customize your process flow diagram by using symbols from the library. You have to click and drag the symbols you need and add them to your chart. You can also add text and change font and styles, and text color. You can add shapes, and there is a toolbar at the top of the canvas with various customization options.
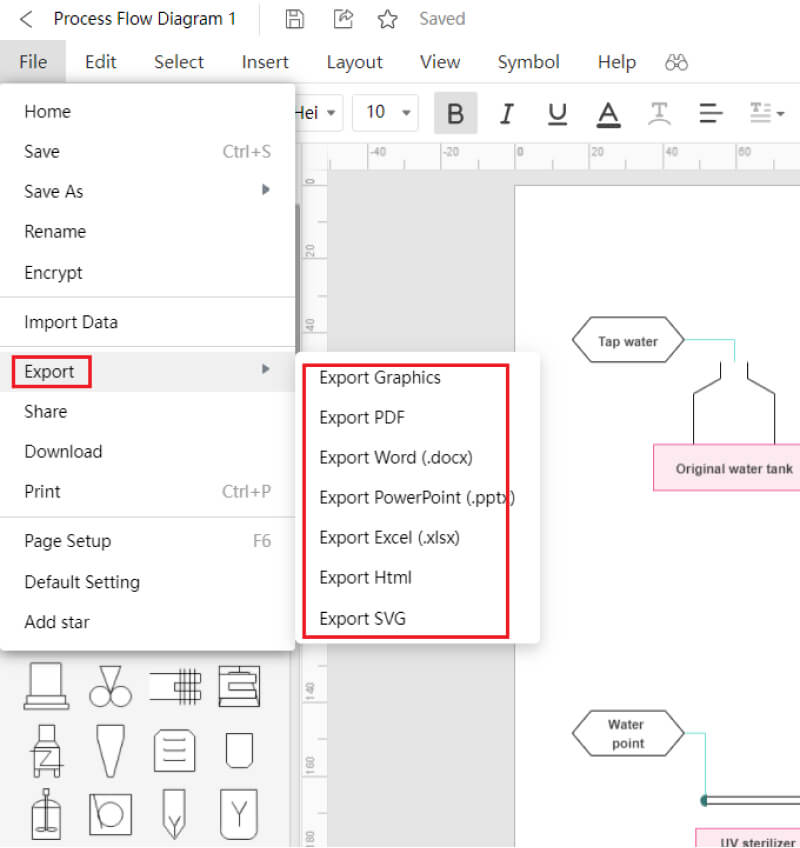
You can save your drawing in all popular formats using EdrawMax Online. All you have to do is go to files and click the save or export options. Please select the format you require, such as docs for a text file or jpeg to export it as an image.
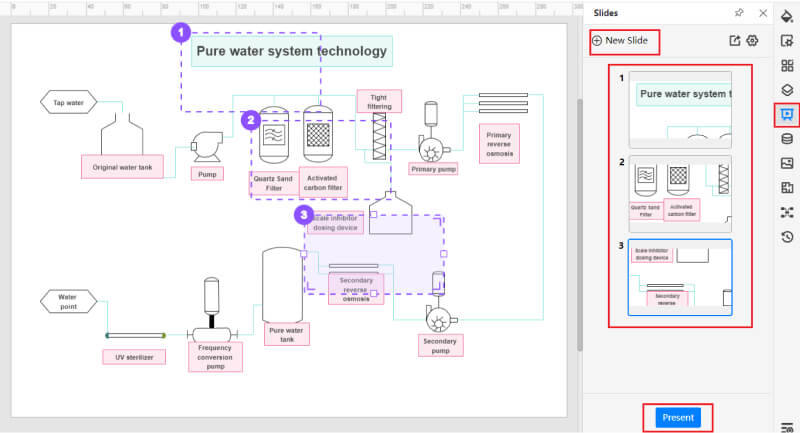
You can create presentations on EdrawMax Online for your project. You can add slides to explain your diagram. You can style every slide differently to make it more creative.
4. Expert Tips for Creating PFD
Following are the three tips that you must keep in mind while drawing a P&ID.
Tip 1: Add tasks in a chronological order
The best way to create a process flow diagram is to add the main activities of the process before any other component. After that, you can start adding detailed tasks for these activities to make things easy to understand. You can then add all components needed to complete each task. This way, your diagrams are easy to explain in a presentation, and you can add as many details without complicating the process.
Tip 2: Use good diagram software and specify each symbol
With EdrawMax Online, you can start creating PFD after defining its process. It gives you a wide range of symbols and templates so that you can plan the diagram and draw it right away. Make sure to use the same symbols to represent similar components to avoid complications.
Tip 3: Use Notes
Creating a simple PFD seems easy, but developing a complex PFD with lots of components and values, and activities is not easy for a beginner. Make sure to understand the details and features of the process before you draw it. If it is your first time, then add side notes to keep track of every activity.
5. Key Takeaways
When you create a process flow diagram, you can easily document any process and its components and activities. It also helps you find inefficient activities that you can either improve or replace with other activities. Make sure you have an understanding of the overall process and PFD symbols before you create your diagram.
EdrawMax Online is very helpful for creating a PFD. You can customize your diagrams using fonts, colors. You can select any symbol or icon. It also helps you add slides and make your diagram by changing its default professional templates. Find more process flow diagram templates.